Tingyun iOS SDK installation
1. Set application name
Please set an easy-to-identify app name for the App that needs to be monitored. The App name will show on the App list and the associated report to represent the corresponding App.
App names can use alphabet, number and Chinese and up to 32 characters length. Set the App name, try not to set a repeat App name, so as not to cause unnecessary trouble.
Your App name can be edited at any time in the setup options
2. Select the Framework introduce method
Tingyun App iOS SDK supports iOS 6.0 or higher iOS system, and supports CocoaPods.
2.1. Download Tingyun App iOS and introduce Framework
Download Tingyun App iOS SDK:
nbs-newlens-ios.zip
2.1.1. Use Tingyun App iOS SDK
Unzip the downloaded SDK package, select the “tingyunApp.framework” file in the extracted folder, and drag it to the Xcode project of the iOS App that needs to be monitored
Note: from 2.1.4 version, Tingyun App iOS framework changes its name from “libNBSAppAgent.framework” to “tingyunApp.framework”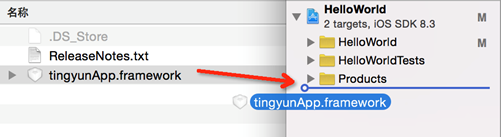
i. In Xcode, select the Project Navigator window and place the dragged folder icon under the “HelloWorld” folder group.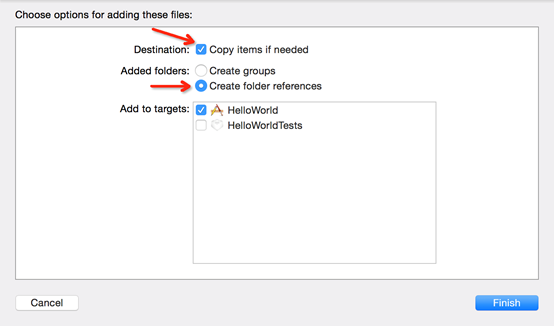
ii. When Xcode pops up, select “Copy items into destination group’s folder” and “Create folder references for any added folders” and confirm.
iii. Add the following four libraries to the link settings for the iOS App project to be monitored and select the App project to be monitored in the Xcode Project Navigator window:
a) Select the corresponding App in Target;
b) Switch to the “Build Phases” setting page;
c) Expand the “Link Binary With Libraries” setting item and click “+” to enter the window
CoreTelephony.framework
Security.framework
SystemConfiguration.framework
libz.tbd (Note: Please add libz.dylib before Xcode7)
iv. 4 libraries
2.2. Introduce Framework via CocoaPods
2.2.1. Use of CocoaPods
1) Add the following to the Podfile file of the current project root directory
pod "tingyunApp"
2) Enter the following command in the current project root directory:
pod install
3) After successful installation, start Xcode with the following command line
open App.xcworkspace
3. Enable Tingyun App iOS SDK
3.1. Introduce header file for the App iOS SDK
1) Introduce the header file of Tingyun App agent in the pch file of the App to be monitored:
#import <tingyunApp/NBSAppAgent.h>
Note: After Xcode 6, the project will not automatically create pch file, you need to create their by your own, refer to Appendix 1
// PrefixHeader.pch
#ifdef __OBJC__
#import <tingyunApp/NBSAppAgent.h>
//...
#endif
2) Add the following code to the main function of the embedded project project / main.m file:[NBSAppAgent startWithAppID:@"AppKey"];
e.g.:int main(int argc, char * argv[]) {@autoreleasepool {[NBSAppAgent startWithAppID:@"AppKey "]; return UIApplicationMain(argc, argv, nil,
NSStringFromClass([AppDelegate class])); }}
4. Installation Verification
Run the project after the installation is complete, connect computer and use the Device to see the log date
The following log appears means that the installation is successful: NBSAppAgent “TingYun_Version”---->start!Success to connect to NBSSERVER
5. Regular data collection
If the above steps are correct,Tingyun App iOS SDK agent has been successfully deployed to the App to be monitored. Run the app to be detected in the simulator or real machine, wait 3 to 5 minutes, you can see the performance data of the monitored App in Tingyun App report.
6. Crash symbolization
In order to better help users resolve crash information, we provide a symbolic mechanism to help users quickly and accurately identify the crash location. When you use symbolicization, you need to upload the “dSYM” file of current version to Tingyun server.
6.1. Query symbol table
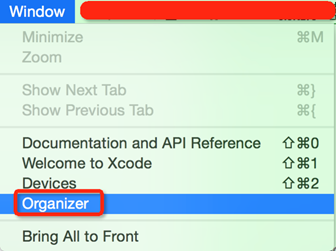
I. Open the embedded project, click on the menu bar “Window” select “Organizer”
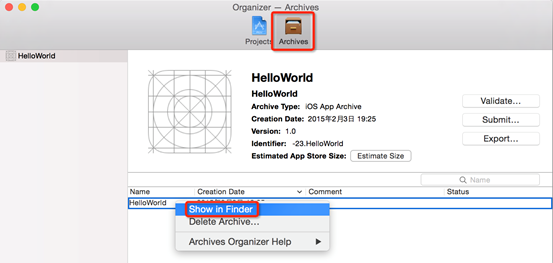
ii. Select “Archives”, find the target project, right click to select “Show in Finder” to enter the file directory
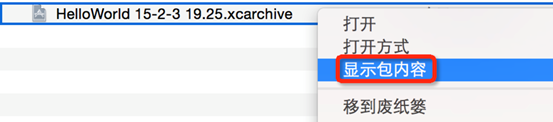
iii. Right-click the “.xcarchive” file and select “Show Package Contents”

iv. Select the corresponding “.app.dSYM” file, such as: “HelloWorld.app.dSYM”, right-click “show package content”

v. Find the symbol file for the project, here for “HelloWorld”
Note: The above marked part is the symbol table file. When you upload, please upload the file instead of xxx.app.dSYM this directory
6.2. Upload dSYM file of the corresponding version
6.2.1. Upload the dSYM file via Xcode + sh script
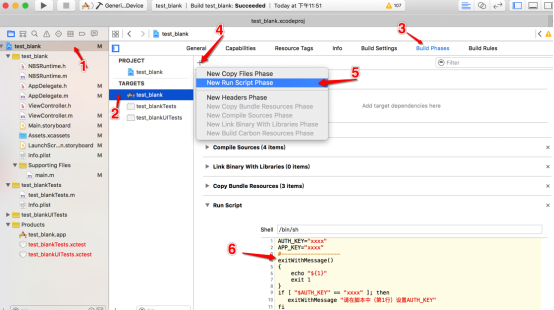
(1) Paste the contents of tingyun.sh in unzipped SD package into the location that step 6 above.
(2) Configure the corresponding AUTH_KEY and APP_KEY.
6.2.2. Manually upload the dSYM file via the report
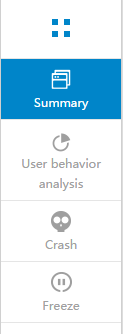
(1) Login Tingyun report, in the App overview, select the corresponding App name, enter the App and select the “crash" button on the left side of the menu bar:
(2) In the right “crash history record list” select and click “dSYM / Mapping file management”, as shown below:

(3) In the pop-up window, select the upload platform type, such as: “iOS”. Select the corresponding application version number, and click the right upload button, manually upload symbol table. As shown below: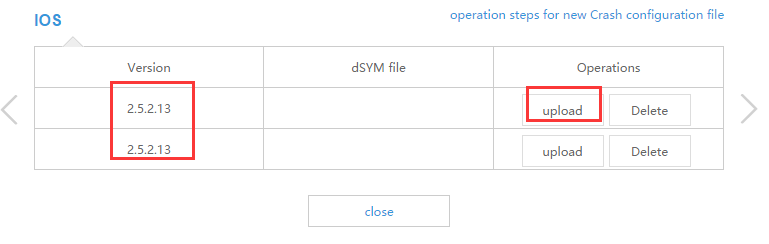
6.2.3. Command Line Upload Symbol Table
(1) Open the terminal, enter the “HelloWorld.app.dSYM” directory (see directory location in method 1 description), enter the following command:
curl -k -F upload=@HelloWorldhttps://report.tingyun.com/symbol/authkey/AUTH_KEY/appkey/APP_KEY
(2) Command line parameter configuration:
HelloWorld = symbol table name
AUTH_KEY: Tingyun API account authorization Key, generated by the reporting system(appendix1)
APP_KEY: Tingyun App authorization Key(appendix2)
(3)Upload Symbol Table
After the configuration is complete, you can upload the symbol table through the command line to Tingyun server. Success means uploading successful.
{"status" : "success", "msg" : "success"}
6.2.4. Configure user-defined additional information
The new version of Crash provides user-defined additional information interface, the user can customize the additional information, which will be uploaded to report server when the application occurs Crash.The user can configure the interface at any location after initialization. .setCustomerData can be configured up to 10 parameters, each “Value” can upload up to 100 bytes.
The user-defined additional interfaces are as follows:[NBSAppAgent setCustomerData:@"helloworld" forKey:@"name"];
7. Create a .pch file
Forthe new project no longer contains. Pch file after Xcode6.0 , you can manually create a pch file, create steps:

i. Create a new pch file: Open Xcode, select File → New → File (or ⌘N).

ii. In the pop-up dialog box, select Other, and then select PCH File.

iii. Click Next, and then enter the “pch” file name, the format is generally “project name -Prefix”.

Select the project → TARGETS → Build Settings, find Apple LLVM 6.0-Language, which has a Prefix Header, double-click it, and then enter the “project name / pch file name”, here the pch file is set up.
Appendix:
1. Configure AuthKey authorization code

i. Login report, select the user name, click to modify the authorization code

ii. Select “Current Authorization Code” to copy to the upload URL
2. Configure AppKey

i. Login report, in the App overview, select the corresponding App name, such as: iOS_SDK. Click the left side of the configuration button, select “modify configuration”

ii. Enter the “modify configuration”, find the “install SDK”, select ”App Key" to copy to the upload URL